Your shopping cart is empty!


Golan APN Settings
Golan Israel Internet settings
Every carrier uses different access points (APN) settings for wireless DATA connection, some phones like the iphone or Blackberry will automatically configure the APN settings, other type phones like Nokia/Android need to be configured manually.
Q: What is “APN”? A: “APN” stands for Access Point Networks. It allows you to connect to the internet & identifies your data
Important: First make sure data services and 3G is enabled under network settings, with Golan you need to enable data roaming to get data access, Golan is using the Cellcom network, therefore, you need to enable roaming.
Android APN settings
1. From the Home screen, press the Menu key - Settings - wireless & networks.
Note: This varies on different software versions.
2. Touch Mobile Networks. - Touch Access Point Names or APNs.
3. Click “Menu” and then “New APN”.
Enter Name and APN (-Access Point Name (APN): internet.golantelecom.net.il ).
Leave Username, Password and other entries blank.
4. When you are done, press the Menu key and Save, Reboot your phone, and test out your internet connection.
To watch a video on how this is done go to: www.youtube.com/watch?v=FOm4ctxTx0I
Apple APN settings
Important: enable data roaming under the network setting to get data access, you should also change the network mode from LTE to GSM.
Iphone uses do not need to change any settings, sometimes you need to reset the network setting under settings, you can also do a soft reset by holding down the power button together with the menu key until the phone powers off and back on again.
If the iPhone does not automatically find the internet APN setting you will need to manually enter the APN settings
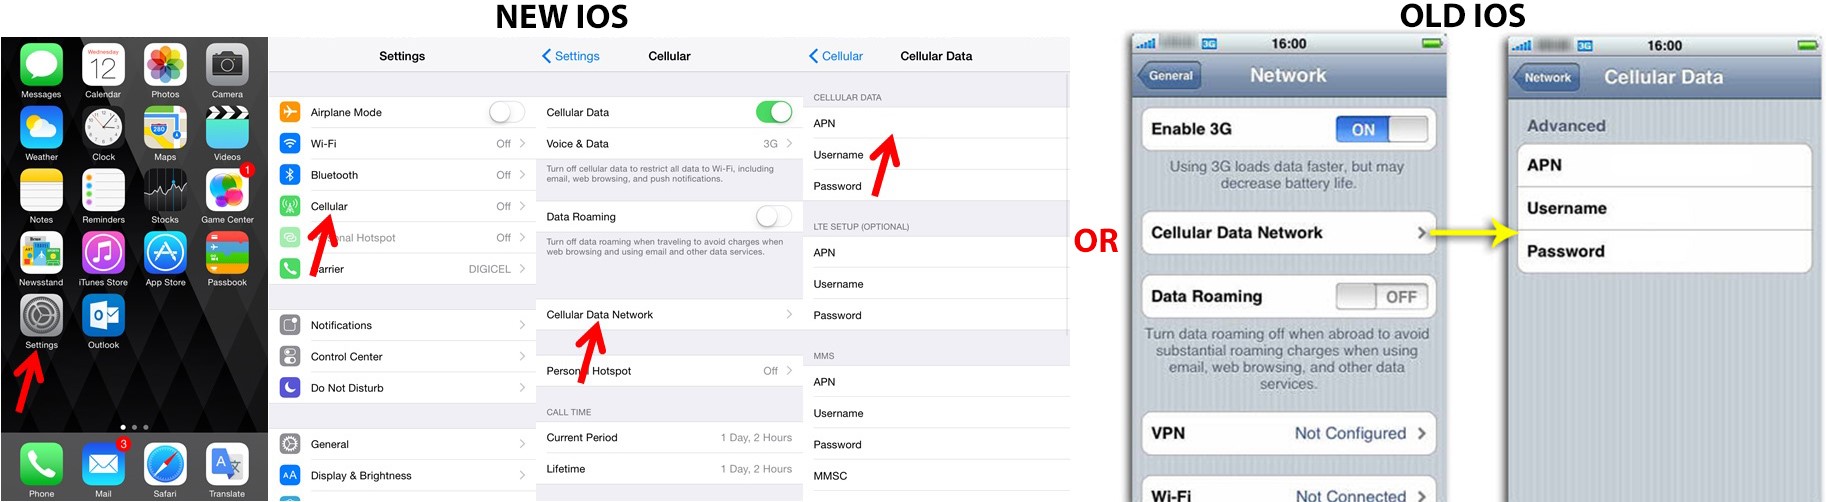
For New iOS device: Go to the Settings > Cellular > Cellular Data Network,
For old iOS Setting > Mobile > Mobile data options > Mobile data Network > Apn
See below for the only two settings you need to enter, leave the rest undefined
APN: internet.golantelecom.net.il
Basic phone APN settings
Settings for basic phones are different from model to model. Find your phone's APN settings using the how to's or user manual for your phone at and enter the required APN information, internet.golantelecom.net.il, for Nokia settings see below
Go to Menu > Settings > Configurations.
Select Personal Configuration settings > Add.
Fill in Account Name.
Select Access Point Settings > Bearer Settings.
Enter the Access Point Name (APN).
Leave Username and Password blank.
Go back to Personal Configuration menu.
Select the Account Name and click Option and choose Activate. Done.
BlackBerry APN settings - BlackBerry 10
1. From the home screen, tap Options.
2. Tap Network Connections - Tap Mobile Network. - Tap APN at the bottom of the screen.
3. Enter the required APN information - Access Point Name (APN): internet.golantelecom.net.il
4. Tap Save at the top of the screen.
Previous BlackBerry OS
1. From the Home screen, scroll to and select Options.
2. Perform one of the following (depending on your device software version):
· For BlackBerry OS 4.0 or older select TCP / IP.
· For BlackBerry OS 4.1 to 5.0 select Advanced Options > TCP / IP.
· For BlackBerry OS 6.0 or newer select Device > Advanced System Settings > TCP / IP
· Enter the required APN information - Access Point Name (APN): internet.golantelecom.net.il - Select Save.
Windows phone APN settings
Settings for Windows phones are different from model to model. Find your phone's APN settings using the how to's or user manual online
for your phone and enter the required APN information. - Access Point Name (APN): internet.golantelecom.net.il
Steps to follow if "access point" if app has not been installed
1.Swipe left to view the Apps list
2.Tap Settings
3.Tap mobile network
4.Ensure Data connection is set to on
5.Tap add Internet apn button
6.Set APN
7.Tap the Save button
Steps to follow if "access point" app has been installed
1.Swipe left to view the Apps list
2.Tap Settings
3.Tap access point
4.Currently active settings will be marked as active,
Press and hold the setting until options menu appears